この記事では、React + TypeScriptでmuiを使ったページを作り始めるための準備をするための手順を説明します。
muiは以前はMaterialUIと呼ばれていました。
プロジェクトを作る
npx create-react-app 211107-create-react-app --template typescript
動作確認
cd 211107-create-react-app
npm start
muiのインストール
npm install @mui/material @emotion/react @emotion/styled
npm install @mui/icons-material
フォントとアイコン用のスタイルシート読み込み
public/index.htmlに下記の2行を追加する。
    <link rel="stylesheet" href="https://fonts.googleapis.com/css?family=Roboto:300,400,500,700&display=swap"/>
    <link rel="stylesheet" href="https://fonts.googleapis.com/icon?family=Material+Icons" />
言語をjaに変更しておく
- <html lang="en">
+ <html lang="ja">
ファイル全体を見ると、下記の形になる
<!DOCTYPE html>
<html lang="en">
  <head>
    <meta charset="utf-8" />
    <link rel="icon" href="%PUBLIC_URL%/favicon.ico" />
    <meta name="viewport" content="width=device-width, initial-scale=1" />
    <meta name="theme-color" content="#000000" />
    <meta name="description" content="Web site created using create-react-app" />
    <link rel="apple-touch-icon" href="%PUBLIC_URL%/logo192.png" />
    <link rel="manifest" href="%PUBLIC_URL%/manifest.json" />
    <link rel="stylesheet" href="https://fonts.googleapis.com/css?family=Roboto:300,400,500,700&display=swap"/>
    <link rel="stylesheet" href="https://fonts.googleapis.com/icon?family=Material+Icons" />

    <title>React App</title>
  </head>
  <body>
    <noscript>You need to enable JavaScript to run this app.</noscript>
    <div id="root"></div>
  </body>
</html>
ボタンが有るだけのページを作る
src/App.tsxを下記の形に書き換える
import React from 'react';
import Button from '@mui/material/Button';
function App() {
return (
<>
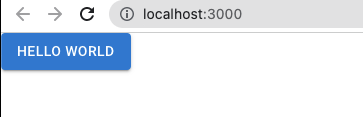
<Button variant="contained">Hello World</Button>
</>
);
}
export default App;
以下のように表示されればOK。
ヘッダとタイトル、ボタンが有るページを作る
src/App.tsxを下記の形に書き換える
import React from 'react';
import AppBar from '@mui/material/AppBar';
import Toolbar from '@mui/material/Toolbar';
import Typography from '@mui/material/Typography';
import Container from '@mui/material/Container';
import Paper from '@mui/material/Paper';
import Button from '@mui/material/Button';
function App() {
return (
<>
<AppBar
position="absolute"
color="default"
elevation={0}
sx={{position: 'relative', borderBottom: (t) => `1px solid ${t.palette.divider}`}}
>
<Toolbar>
<Typography variant="h6" color="inherit" noWrap>
Hello world
</Typography>
</Toolbar>
</AppBar>
<Container component="main" maxWidth="md" sx={{ mb: 4 }}>
<Paper variant="outlined" sx={{ my: { xs: 2, md: 2 }, p: { xs: 2, md: 3 } }}>
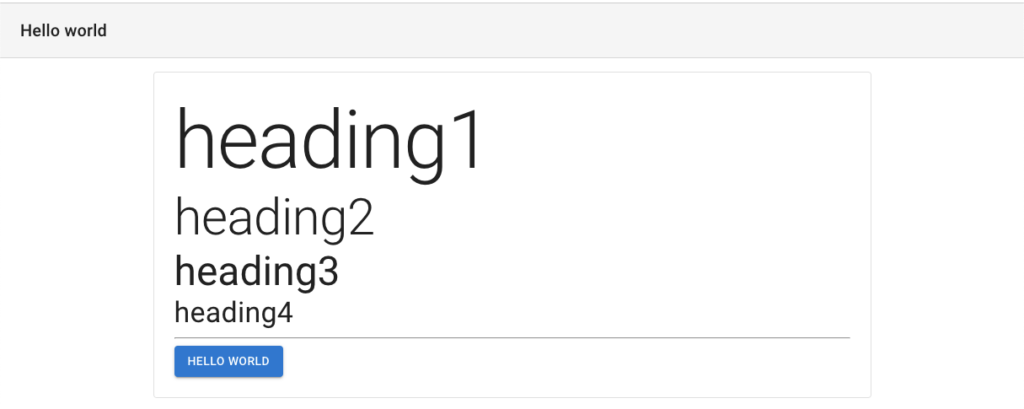
<Typography component="h1" variant="h1">heading1</Typography>
<Typography component="h2" variant="h2">heading2</Typography>
<Typography component="h3" variant="h3">heading3</Typography>
<Typography component="h4" variant="h4">heading4</Typography>
<hr />
<Button variant="contained">Hello World</Button>
</Paper>
</Container>
</>
);
}
export default App;
以下のようにヘッダとコンテンツ枠が表示されて、枠内にタイトルとボタンが表示されればOK。
関連記事